本文介绍Spring-Boot中使用拦截器,一般在拦截器中处理跨域处理,允许跨域访问项目,拦截器使用详细资料请查阅官网。
实现自定义拦截器步骤:
1、创建一个类并实现HandlerInterceptor接口。
2、创建一个Java类继承WebMvcConfigurerAdapter,并重写 addInterceptors 方法。
2、将自定义的拦截器交由spring管理,然后将对像手动添加到拦截器链中(在addInterceptors方法中添加)。
创建拦截器类
package com.example.springboot.config.intercepter;
import org.springframework.stereotype.Component;
import org.springframework.web.servlet.HandlerInterceptor;
import org.springframework.web.servlet.ModelAndView;
import javax.servlet.http.HttpServletRequest;
import javax.servlet.http.HttpServletResponse;
/** * @desc 自定义拦截器,使用 @Component 让 Spring 管理其生命周期 * @Author wangsh * @date 2018/5/6 17:06 * @return */@Componentpublic class TestIntercepter implements HandlerInterceptor {
@Override public boolean preHandle(HttpServletRequest request, HttpServletResponse response, Object handler) throws Exception {
System.out.println(">>>preHandle>>>>>>>在请求处理之前进行调用(Controller方法调用之前)");
setCrossDomain(response);
return true;
// 只有返回true才会继续向下执行,返回false取消当前请求 }
@Override public void postHandle(HttpServletRequest request, HttpServletResponse response, Object handler, ModelAndView modelAndView) throws Exception {
// 请求处理之后进行调用,但是在视图被渲染之前(Controller方法调用之后);
System.out.println(">>>postHandle>>>>>>>请求处理之后进行调用,但是在视图被渲染之前(Controller方法调用之后)");
}
@Override public void afterCompletion(HttpServletRequest request, HttpServletResponse response, Object handler, Exception ex) throws Exception {
// 在整个请求结束之后被调用,也就是在DispatcherServlet 渲染了对应的视图之后执行(主要是用于进行资源清理工作);
System.out.println(">>>postHandle>>>>>>>在整个请求结束之后被调用,也就是在DispatcherServlet 渲染了对应的视图之后执行(主要是用于进行资源清理工作)");
}
/** * @param @param response 设定文件 * @return void 返回类型 * @throws * @Title: setCrossDomain * @Description: TODO(设置跨域问题) */ private void setCrossDomain(HttpServletResponse response) {
response.addHeader("Access-Control-Allow-Origin", "*");
response.addHeader("Access-Control-Allow-Methods", "POST,GET");
response.addHeader("Access-Control-Allow-Credentials", "true");
}
}
将自定义拦截器添加到拦截器链中
package com.example.springboot.config.config;
import com.example.springboot.config.intercepter.TestIntercepter;
import org.springframework.beans.factory.annotation.Autowired;
import org.springframework.context.annotation.Configuration;
import org.springframework.web.servlet.config.annotation.InterceptorRegistry;
import org.springframework.web.servlet.config.annotation.WebMvcConfigurerAdapter;
/** * 注册bean */@Configurationpublic class InterceptorConfig extends WebMvcConfigurerAdapter {
@Autowired private TestIntercepter testInterceptor;
@Override public void addInterceptors(InterceptorRegistry registry) {
registry.addInterceptor(testInterceptor);
}
}
创建controller类
package com.example.springboot.config.conroller;
import org.springframework.web.bind.annotation.RequestMapping;
import org.springframework.web.bind.annotation.RestController;
@RestController@RequestMapping("/user")public class UserController {
@RequestMapping("/hello") public String hello(){
return "hello";
}
}
创建启动服务类
package com.example.springboot.config;
import org.springframework.boot.SpringApplication;
import org.springframework.boot.autoconfigure.SpringBootApplication;
@SpringBootApplicationpublic class SpringbootConfigApplication {
public static void main(String[] args) {
SpringApplication.run(SpringbootConfigApplication.class, args);
}
}
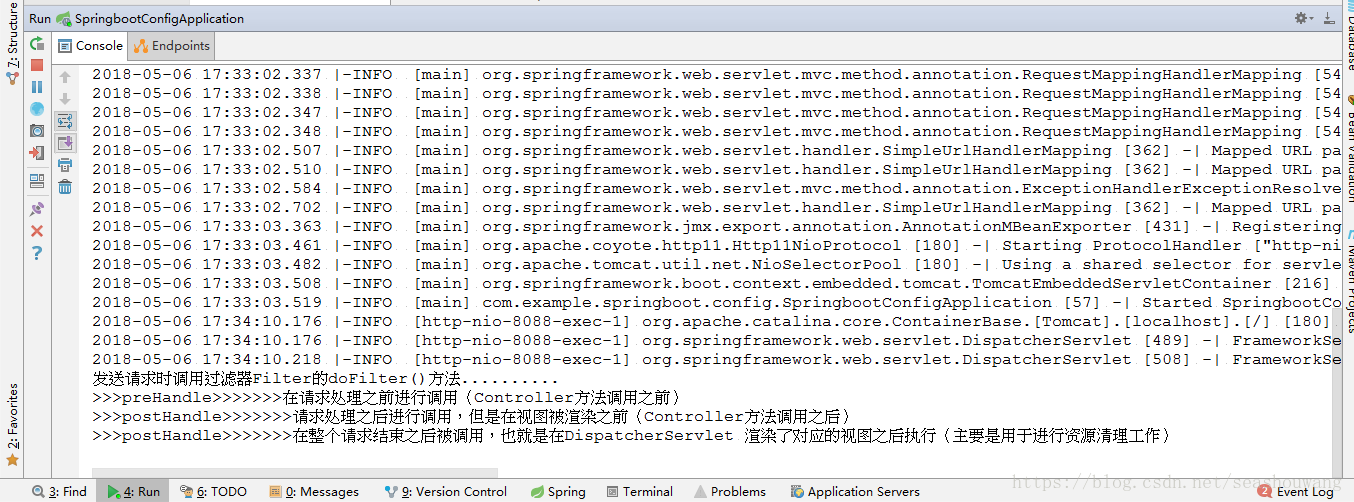
启动服务测试,在浏览器访问http://localhost:8088/hello ,打印日志如下,可以看出经过了拦截器。
总结
以上所述是小编给大家介绍的springboot config 拦截器使用方法实例详解,希望对大家有所帮助,如果大家有任何疑问欢迎给我留言,小编会及时回复大家的!
您可能感兴趣的文章:
- 详解Spring-boot中读取config配置文件的两种方式
- Spring Boot报错:No session repository could be auto-configured, check your configuration的解决方法
- 详解SpringBoot AOP 拦截器(Aspect注解方式)
- spring boot拦截器实现IP黑名单实例代码
- spring boot如何添加拦截器
- SpringBoot拦截器实现对404和500等错误的拦截
- spring boot实现过滤器和拦截器demo
- springboot实现拦截器之验证登录示例

